- Home
- Incubation day by day
- Day 15
Incubating eggs: day 15.
Week 3 of incubation – not long till hatch day!
It's been a long and sometimes stressful time in the process of incubating eggs. At last, we're on the home stretch with only one week to go to hatch day.
So this week, because there's a limit to what we can do and see in the egg, we'll also start looking at what we need for when our chicks hatch.
Excited? Let's go!

What's going on in the egg today?
- The chick now fills most of the egg; the remainder is filled by the yolk which will become increasingly important between now and the end of incubation.
- The white, or albumen, is almost gone.
- If we opened the egg we'd see that the beak looks a little shorter today, and we'd be able to see the egg tooth clearly. This is because the beak's covering is falling away, exposing the egg tooth and preparing it for hatch.
What's happening to the chick at day 15 of incubation?
- The chick now has everything it needs to hatch successfully. Incubation from this point is all about the process of finalising its development.
- Today the bones, claws, skull and scales on the legs are all growing and hardening.
- The chick is still slowly turning into the right position to hatch, but at this point remains lengthways down the egg.
- Most importantly, though, the small intestine – the chick's 'gut' – which has been on the outside of the body during incubation so far – starts to be absorbed into the chick's body.
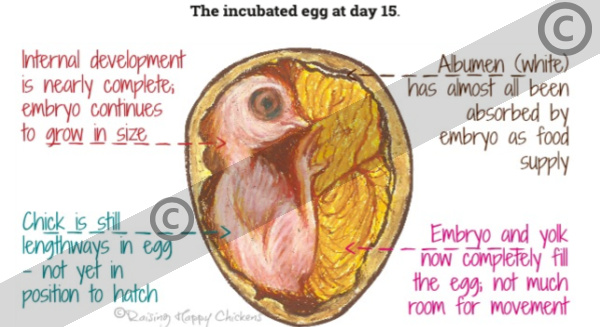
- This is a critical development. Over the next period before hatching, the whole of the yolk will also be taken into the body cavity. This gives the chick food for its first hours of life.
- It's this process which makes it so incredibly important that the chick is not 'helped' to hatch before it's ready. If it comes out of the egg too early, before the gut and yolk have been fully absorbed, the chick will die.
- We'll refer back to this again in the days ahead.
What can we see if we candle the egg?
Candling is becoming more difficult now in the sense that it's hard to make out much detail.
The embryo is filling a large proportion of the egg and the most that you'll see will be its outline, and possibly some large veins in the lighter area at the bottom of the shell.
Occasionally you might be able to see movement in that area – but don't panic if you can't.
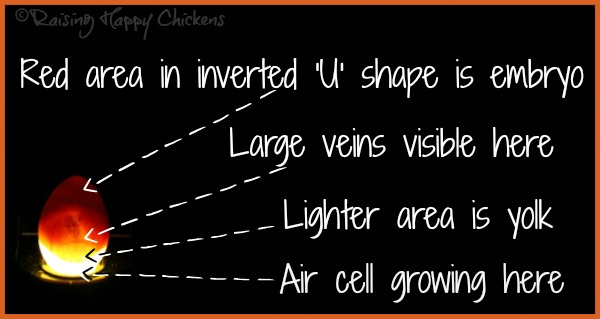
Even altering the saturation and contrast of the photograph, as I've done in other candling pictures through this series, doesn't help any more because so much less detail is visible.
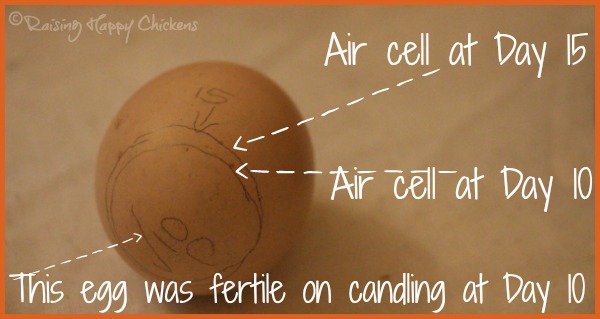
Outside the egg you'll be able to see the air cell growing until, at the point of internal pipping, it's large enough for the chick to take its first breath.
Remember to mark the air cell when you candle, so you can be sure of development. This egg clearly shows the air cell's growth from day 10 to day 15.
Incubating eggs: what should we be doing today?
If you've not candled your eggs for a while you might feel tempted to do it now. It's certainly a good idea to candle any eggs you were concerned about, particularly those which were not developing.
In terms of the rest, though, we'll be candling all the eggs just before they go into "lockdown" at Day 18. That's only three days away.
So my advice would be tocontinue turning the eggs, as we have been doing since day 1, but otherwise leave the eggs alone at day 15, unless you have any you're worried about.
As an example, occasionally I will candle again if I think an egg has developed a crack, but not otherwise.
Can anything go wrong at this stage of incubating eggs?
 Pin Me!
It's time to take out of the incubator any eggs which have not developed.
If an embryo hasn't grown by day 15 of incubation it won't start now. Instead, the egg shell will have become more and more porous, allowing bacteria to enter.
In a warm, humid incubator bacteria will multiply quickly, and the contents of the egg will simply go bad.
So candle any eggs which you're not sure about now, and discard those showing no signs of development.
And don't forget the rest of your clutch in the incubator. Use your eyes and your nose: if you get a bad smell near your incubator, or if you see a crack with any sign of a liquid or gunky substance coming from it, investigate immediately.
If an egg is "bad" nothing will be developing and the chances are strong that it will explode and spread bacteria across the incubator. Once that happens your hatch is lost.
Question of the day.
I've heard that bantam eggs hatch earlier than chicken eggs. Should I stop turning my bantams and expect them to hatch soon?
Gail Dammerow's book 'Hatching and Brooding Your Own Chicks', which is my go-to book for all things incubating, talks about bantam eggs hatching at day 19 or 20.
Of course, incubation isn't an exact science. Whether bantam or large breed, some eggs will hatch "on time" at day 21; others either earlier or later.
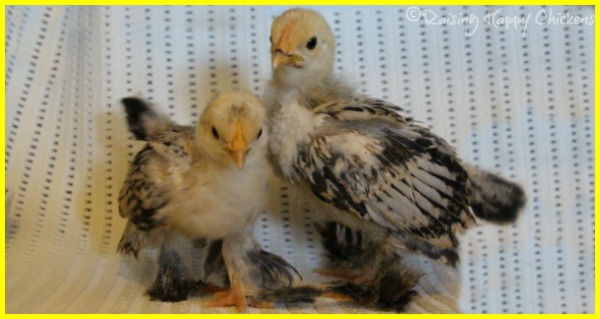
These are two of my Lemon Millefleur Sablepoot bantams, Bonnie and Clyde, who both hatched at day 21.
Whether and when you should stop turning is really a matter for your judgement.
If,
when you candle, they look further developed than today's pictures show,
you might want to stop turning now. It won't be a problem – in fact
some people stop turning even their large breeds at day 14 - 15.
Personally I keep turning bantams until day 17 and large breeds until the end of day 18.
Incubating eggs: where would you like to go now?
If you'd like to go back to the start of this 21-day series, use the first button link. To refresh your memory about yesterday's developments, use the day 14 link; to move onto tomorrow it's day 16.
Related pages you may find helpful.
Sources.
A lot of "facts" you'll find on the internet are often people's individual views, based on inaccurate information repeated from poor quality sources.
The information I provide in this article and others is based on both my own experience of incubating and hatching chicken eggs every year for over 13 years, but on evidenced facts from scientific, peer-reviewed research and books from highly respected and experienced poultry keepers such as Gail Damerow.
Some of the trusted sources I have used in this article are these.
Avitronics: Heart Rates. Pub. Avian ID, 2020.
Damerow, Gail: Hatching and Brooding Your Own Chicks. Pub. Storey, 2013. See my review, here.
Hall, C., et al: A new candling procedure for thick and opaque eggs and its application to avian conservation management. Pub. Journal of Zoobiology, 2022.
Hamburger, V and Hamilton, H L: A series of normal stages in the development of the chick embryo. Pub. Journal of Morphology, 1951.
Leonor, H., and Chaveiro, S: The Effect of Candling on the Hatchability of Eggs from Broiler Breeder Hens. Pub. Journal of Applied Poultry Research, 1993.
Phuphanin, A., et al: Smartphone-Based Device for Non-Invasive Heart-Rate Measurement of Chicken Embryos. Pub. National Center for Biotechnology Information, 2019.
Vargas, R., et al: Egg Candling Analysis Equipment Design: A Safety Solution. Pub. Journal of Social and Behavioural Sciences, 2018.
Wu et al: Egg fertility and reduced egg fertility, hatching success, and larval survival. Pub. Science Direct, 2003.
- Home
- Incubation day by day
- Day 15
Some links in the following sections are affiliate links, which means that if you purchase a product through them I receive a small commission. There is no extra cost to you. Find more details on this page.
Because my integrity and your satisfaction are very important to me, I
only recommend products I have purchased or would purchase myself and which I believe
would benefit you.
