- Home
- Plants for Chickens
- Grow garlic
How to grow garlic for chickens in 6 simple steps.
Garlic isn’t just a kitchen staple, it’s also a natural health booster for your flock.
Feeding garlic to chickens has been shown to strengthen their immune systems, support egg quality, and even help deter pests.
And while you can buy bulbs in the supermarket, they tend to be modified, whereas growing your own means you control the quality from start to finish. Home-grown garlic is not only fresher, it's also healthier and cheaper.
It’s easier than you might think. With just a few cloves, a bit of soil, and some patience, you can produce enough fresh garlic to keep both you and your chickens supplied for the year.
Here’s how to get started, in six simple steps.
🪶 Featherlight Takeaways.
Quick insights from this article – especially helpful if you want the quick version before diving into the full 6 steps.
- Don't use supermarket garlic: buy untreated, organic seed bulbs instead.
- Plant cloves in late autumn (October–December) for the strongest growth.
- Space carefully: 6" between cloves, 12" between rows.
- Water in spring, but stop once stalks yellow to prevent rot.
- Harvest in mid-summer and dry bulbs for long storage (up to a year).
This is a long article. If you're looking for a particular step, these links will help.
Step 1: Sourcing the garlic.
Don't try to use supermarket bulbs.
- They’re often chemically treated and may be unsuitable for your climate or modified so they won’t sprout.
- Instead, look for organic, non-GMO seed garlic from a local feed store, garden centre, or a trusted mail-order supplier. In the UK, I use Thompson and Morgan.
- A single clove will grow into a full bulb of between 12 and 20 new cloves, so a small purchase goes a long way.
Step 2: Prepare for planting.
Best information particularly if you have heavy soil or limited space.

%20health%20in%206%20easy%20steps.%20%23homesteading%20%23backyardchickens%20%23garlicbenefits%20%23growinggarlic%20%23garlicpictures)
- Garlic thrives in well-drained soil and a sunny site with a little shade.
- If growing outside, clear weeds from the plot and dig in well-rotted organic manure or compost to enrich the ground.
- If your soil is heavy clay or winter tends to be very wet, start cloves off in pots indoors. Use a general-purpose compost in 2" pots and keep them on a sunny windowsill. Transplant outside once conditions improve in spring.
- Growing indoors is just as straightforward: a long, deep trough on a sunny windowsill works well.
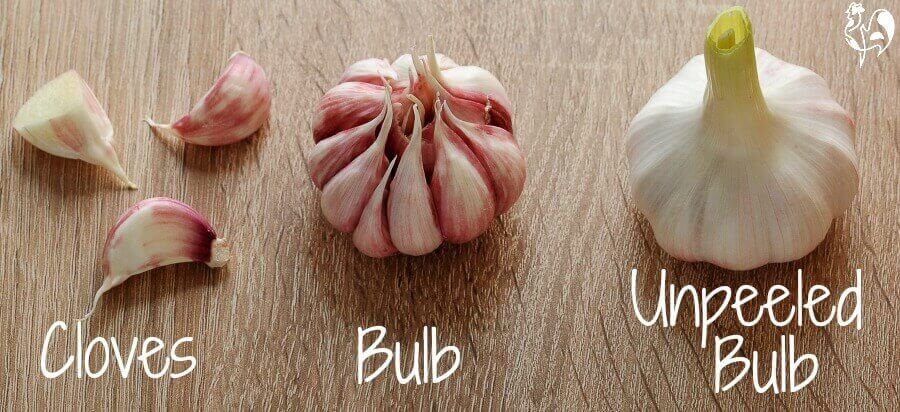
- Before planting, split bulbs into individual cloves — don’t plant the whole bulb. Each clove will produce its own bulb of 12–15 cloves (sometimes more).
- If you're not sure of the difference between a bulb and a clove, take a look at this photo of some of my healthy, home-grown garlic.
Step 3: How and when to plant garlic.
Getting your garlic off to the best start.
- Garlic benefits from a chilling period before growth begins, so the best time to plant is late autumn, or as late as early winter.
- Any time between October and early December will ensure plump, flavourful bulbs the following summer.
- Plant cloves pointy side up, about 1 inch below the surface.
- Space each clove 6 inches apart, with rows about 12 inches apart.
🐥 A note from my flock: when I first asked an Italian neighbour how deep to plant garlic, he told me: "Plant so that the tip of the cloves can hear the church bells".
I’ve always followed that advice, and my cloves seem to enjoy the bells: the bulbs have thrived every year!
 Make sure the cloves are planted so they can hear the church bells!
Step 4: Growing on.
Keeping garlic healthy through spring and summer.
Garlic is very low maintenance, but it does need a little attention as it grows.
- Keep the site free of weeds especially when the garlic growth is new. Weeds compete for nutrients and will stunt the garlic's growth.
- Water in dry spells. Don't allow the soil to dry out, but don't let it become waterlogged either. It should feel damp, not soaked.
- Stop watering when the stalks start to turn yellow, otherwise the bulbs may rot. If I plant in October, I tend to stop watering in June.
- Remove any flowers that form on the growing stalks.
- The green shoots (scapes) can be snipped off before they flower, and used as a garnish in salads or scattered on your chickens' food.
 Snip the shoots for a garlic garnish!
Step 5: Harvesting garlic.
- Once the leaves have turned yellow, the new bulbs are ready to dig up.
- This will usually be about mid-to-late July if planted in October. Garlic takes its time, but the wait is worth it!
- Use a fork rather than a spade or trowel to loosen the soil and lift the bulbs gently. Garlic bruises easily, and damaged cloves don’t store well.
Step 6: Drying and storing.
- Fresh garlic is at its best when completely fresh. Add some to your flock's food or drink as soon as you lift it.
- However, it won’t last long unless dried. Hang bulbs in an airy, shaded spot until the leaves are dry and rustly. Properly dried, garlic will last for up to a year.
- For a rustic touch, try braiding the stalks. Not sure how? Here's a quick video.
Personally, I usually stick with a simple tied bunch. It’s quick, easy, and works just as well!
 I don't bother braiding garlic - simply tie in bunches and hang to dry!
In rural Italy, where I live, each family plants enough garlic to last just for the coming year. Left longer, the flavour starts to fade.
Using homegrown garlic in the flock's diet.
Once you’ve harvested your garlic, why not share it with your chickens? Garlic is especially helpful in autumn and winter, particularly when moulting hens need a nutritional boost.
Here are three simple ways to use it:
- Protein Platter Boost: chop a clove into tiny pieces and mix into my Poultry Protein Platter recipe for an immune-friendly treat.
- Pumpkin Pie Twist: stir a little chopped garlic into my Poultry Pumpkin Pie during October or November for added goodness.
- Garlic Flock Block: as an occasional treat, mix 2 crushed cloves with 1 kilo (4 cups) of warmed suet, your flock’s regular feed, sunflower seeds, dried mealworms, and a cup of treacle (molasses). Press into a cake tin, let it set, and slice off small portions once or twice a week.
Remember: these are treats, not staples. Keep garlic in moderation, just as you would in your own diet.
Conclusion.

Growing your own garlic is one of those small, satisfying steps that benefits both you and your flock.
With a little planning in autumn, you’ll have a year’s supply of fresh bulbs to use in the kitchen and to boost your chickens’ health.
From supporting immunity to deterring pests, garlic has a well-earned place in the coop – and it all starts with planting a few cloves in the soil.
If you’d like to learn more about why garlic is so good for chickens, take a look at my article on the benefits of garlic for chickens.

More plants good for chickens' health.
A short video.
More about food and chicken health.


- Home
- Plants for Chickens
- Grow garlic

Partner of the Month: Eglu Coops

Popular articles


Copyright © 2012- Raising Happy Chickens: All rights reserved regardless of links or attributions.
I do not SELL ANY PERSONAL INFORMATION FROM THIS WEBSITE. PLEASE SEE My PRIVACY POLICY FOR MORE DETAILS.
Click to see my copyright, privacy and affiliates policies.
Click Here to see my policy about external ads, articles and links.
Click here to contact me.