- Home
- Incubation day by day
- Day 5
Incubation for chicken eggs: day 5.
Day 5, and the embryo now has all its major organs present, even though in microscopic form.
Having established their development, the embryo itself has begun to grow in size. It's now clearly visible to the naked eye and can often be seen in candling.
It's an exciting day in the incubation of chicken eggs!
What's happening in the egg today?
* If we could open the egg during the fifth day into incubation we'd see the blood supply has increased considerably, even since yesterday.
* Blood vessels now completely surround the growing embryo.
* The amniotic fluid, which surrounds and protects the embryo, continues to increase. It prevents the embryo from damage, and allows for movement as it grows.
* Under a microscope we would see that the embryo itself has curled its spine so that its head and tail come closer together to form the shape of a letter 'C'.
* This will become even more well defined tomorrow.
* The embryo's eye would also be very obvious, although when candling it's often not visible until a little later in the incubation process.
Incubation for chicken eggs: what's happening to the chick on day 5?
- The embryo is growing rapidly, as it does throughout this first week.
- The blood supply now completely surrounds it as the circulatory system develops more and more branches. These are critical in keeping the embryo supplied with nutrients from both the white and the yolk.
Please note: the image below is a commissioned piece and is subject to international copyright laws. I am the sole copyright owner.
It must not be used, copied or reproduced anywhere without my permission.
Contact me for details and permissions for this and all other images on this page.
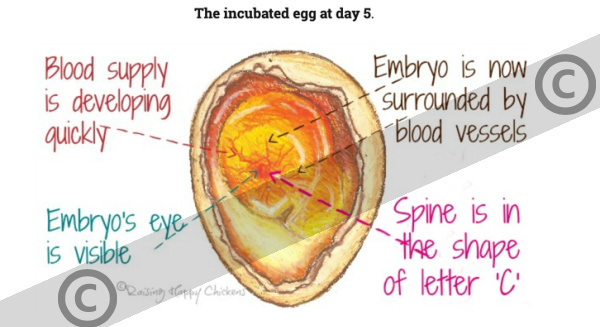
- The allantois is also still developing. Its job is to take waste away from the developing embryo – you can often see it left behind in the shell once the chick has hatched.
- Bones are now beginning to form: the legs and the beak are growing. Both legs and wings will be able to bend within the next twenty-four hours.
- The chicken becomes either male or female as its reproductive organs begin to develop.
What can we see if we candle the egg on day 5?
If you're not sure what you should be looking for today, take a look at this video of some eggs I candled at day 5.
This is the first day when you may be able to see the developing blood vessels, particularly if you're incubating light coloured eggs.
You'll also be able to see the air cell at the blunt end of the egg; this will continue to grow from now throughout incubation. It's a critical stage of development in the incubation for chicken eggs, as it's where the chick will take its first breath of air.
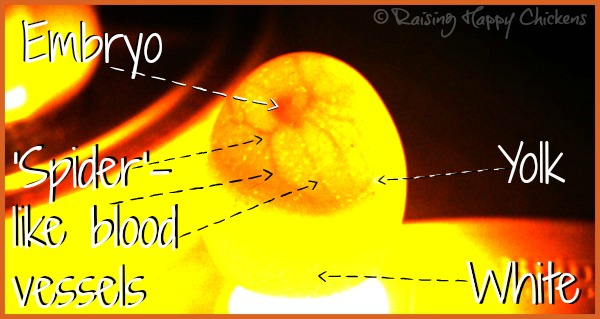
Below is a Wyandotte egg, candled at day 5. This picture shows an unaltered image of what you're likely to see using a basic candler in a darkened room.
That the embryo is developing is unmistakable, but it's difficult to see clearly even though this is a cream coloured egg.
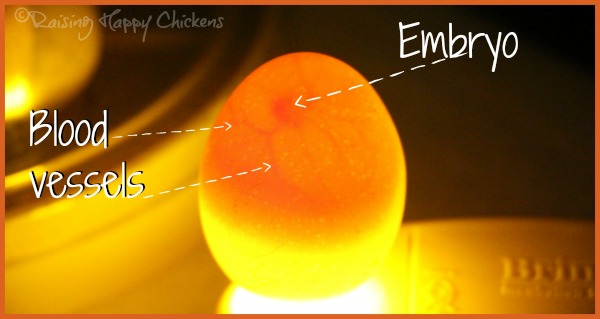
Below is the same picture but with the contrast levels of the photo changed, so that you have a clearer view.
Here you can see that the blood supply has grown since yesterday. The embryo is quite clear at their centre.
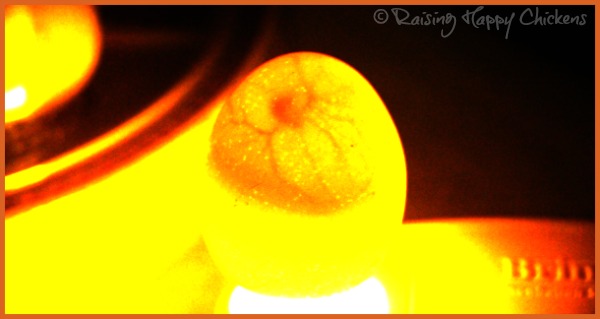
Finally, here's the same image, with my annotations added to show the blood vessels, embryo, yolk and albumen (white) of the developing egg.
What should we be doing today?
Start candling those eggs – within reason.
Day 5 is the first time I would say it's OK to candle if you've never done it before, or if you've only done it infrequently. But be prepared not to see very much.
Why?
As you can see, it's still not terribly easy to see inside the egg at this stage. Even using Brinsea's Ovascope, the details are not clear.
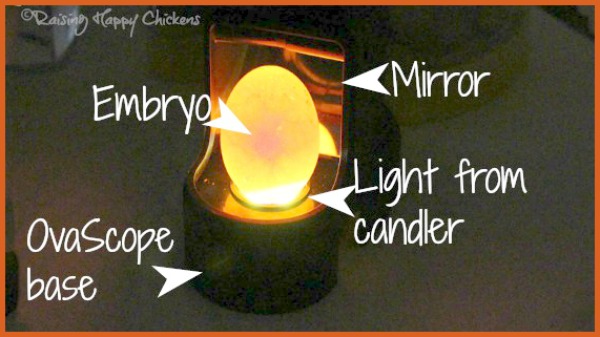
So my suggestion is that if you are desperate to candle – or if your children or grandchildren are – have a go today.
But limit it to one or two eggs, and choose the lightest coloured shells you have in your incubator.
Leave all the other eggs until day 7 of incubation, when it will be clearer which are developing and which aren't.
Can anything go wrong at this stage?
Candling: if you're going to candle one or two eggs, make sure you know what you're doing. Eggs should not be outside the incubator for long, and even the more experienced amongst us have accidents.
This page about what candling is and how to do it will help if it's all very new to you.
Temperature, humidity and turning: remember, temperature and humidity levels need to be kept stable, and the eggs turned, right up until day 18, when we lock the incubator down. At that point, the levels will alter and turning will stop.
If you need to double-check, there's information about temperature and humidity during incubation for chicken eggs, here.
Incubation for chicken eggs: question of the day.
Can I tell at this stage whether I have male or female chickens in the egg?
No. If anyone could tell this, commercial producers would be delighted!
No-one can see whether chicks are male or female until quite a while after hatching unless you have incubated a chicken breed which is sexed by colour such as Red Stars.
Otherwise it's a waiting game. Sometimes, it's not until they start crowing that you can tell who's who!
Incubation for chicken eggs, day by day.
Use the first button link to return to the very beginning of the incubation process, day 4 to go backwards one day, and day 6 to progress to the next exciting day.
Incubating now? You may find these pages helpful.
Sources.
A lot of "facts" you'll find on the internet are often people's individual views, based on inaccurate information repeated from poor quality sources.
The information I provide in this article and others is based on both my own experience of incubating and hatching chicken eggs every year for over 13 years, but on evidenced facts from scientific, peer-reviewed research and books from highly respected and experienced poultry keepers such as Gail Damerow.
Some of the trusted sources I have used in this article are these.
Damerow, Gail: Hatching and Brooding Your Own Chicks. Pub. Storey, 2013. See my review, here.
Hamburger, V and Hamilton, H L: A series of normal stages in the development of the chick embryo'. Pub. Journal of Morphology, 1951.
Wu et al: Egg fertility and reduced egg fertility, hatching success, and larval survival. Pub. Science Direct, 2003.
Leonor, H., and Chaveiro, S: The Effect of Candling on the Hatchability of Eggs from Broiler Breeder Hens. Pub. Journal of Applied Poultry Research, 1993.
Vargas, R., et al: Egg Candling Analysis Equipment Design: A Safety Solution. Pub. Journal of Social and Behavioural Sciences, 2018.
- Home
- Incubation day by day
- Day 5
